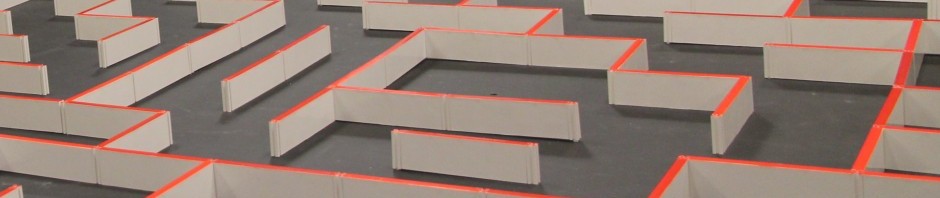
In this post, I am going to talk about how to use side sensors or diagonal sensors to correct longitude position by detecting wall-to-no-wall transition or post-to-post-transition.
Other than using front sensors to correct longitudinal when front wall is available, using side or diagonal sensors to detect the opening of side walls when going straight is also extremely useful to minimized the chance the crash during the search and speed run.
This strategy is always being used whenever the side/diagonal sensor(for my mouse I use diagonal sensor most of the times, so I will use diagonal sensor only to explain the theorem through the entire post) see a opening transitioning from a wall or a single post. In this case, the mouse will be able to recognize its longitudinal position and keep itself on track especially running at a long straight away.
Before I start to make it work, we need to get some data for diagonal sensor in order to observe what will the sensor value look like.
Since the infared light that the LED diode sending out has a cone shape with about 10 degree angle(SFH4545 has 10 degree full angle, SFH4511 has 6 degree full angle, just FYI), so the effective reflecting areas are definitely different between a full wall and a single post since the surface for a post is significantly smaller than a wall(obviously 🙂 ) 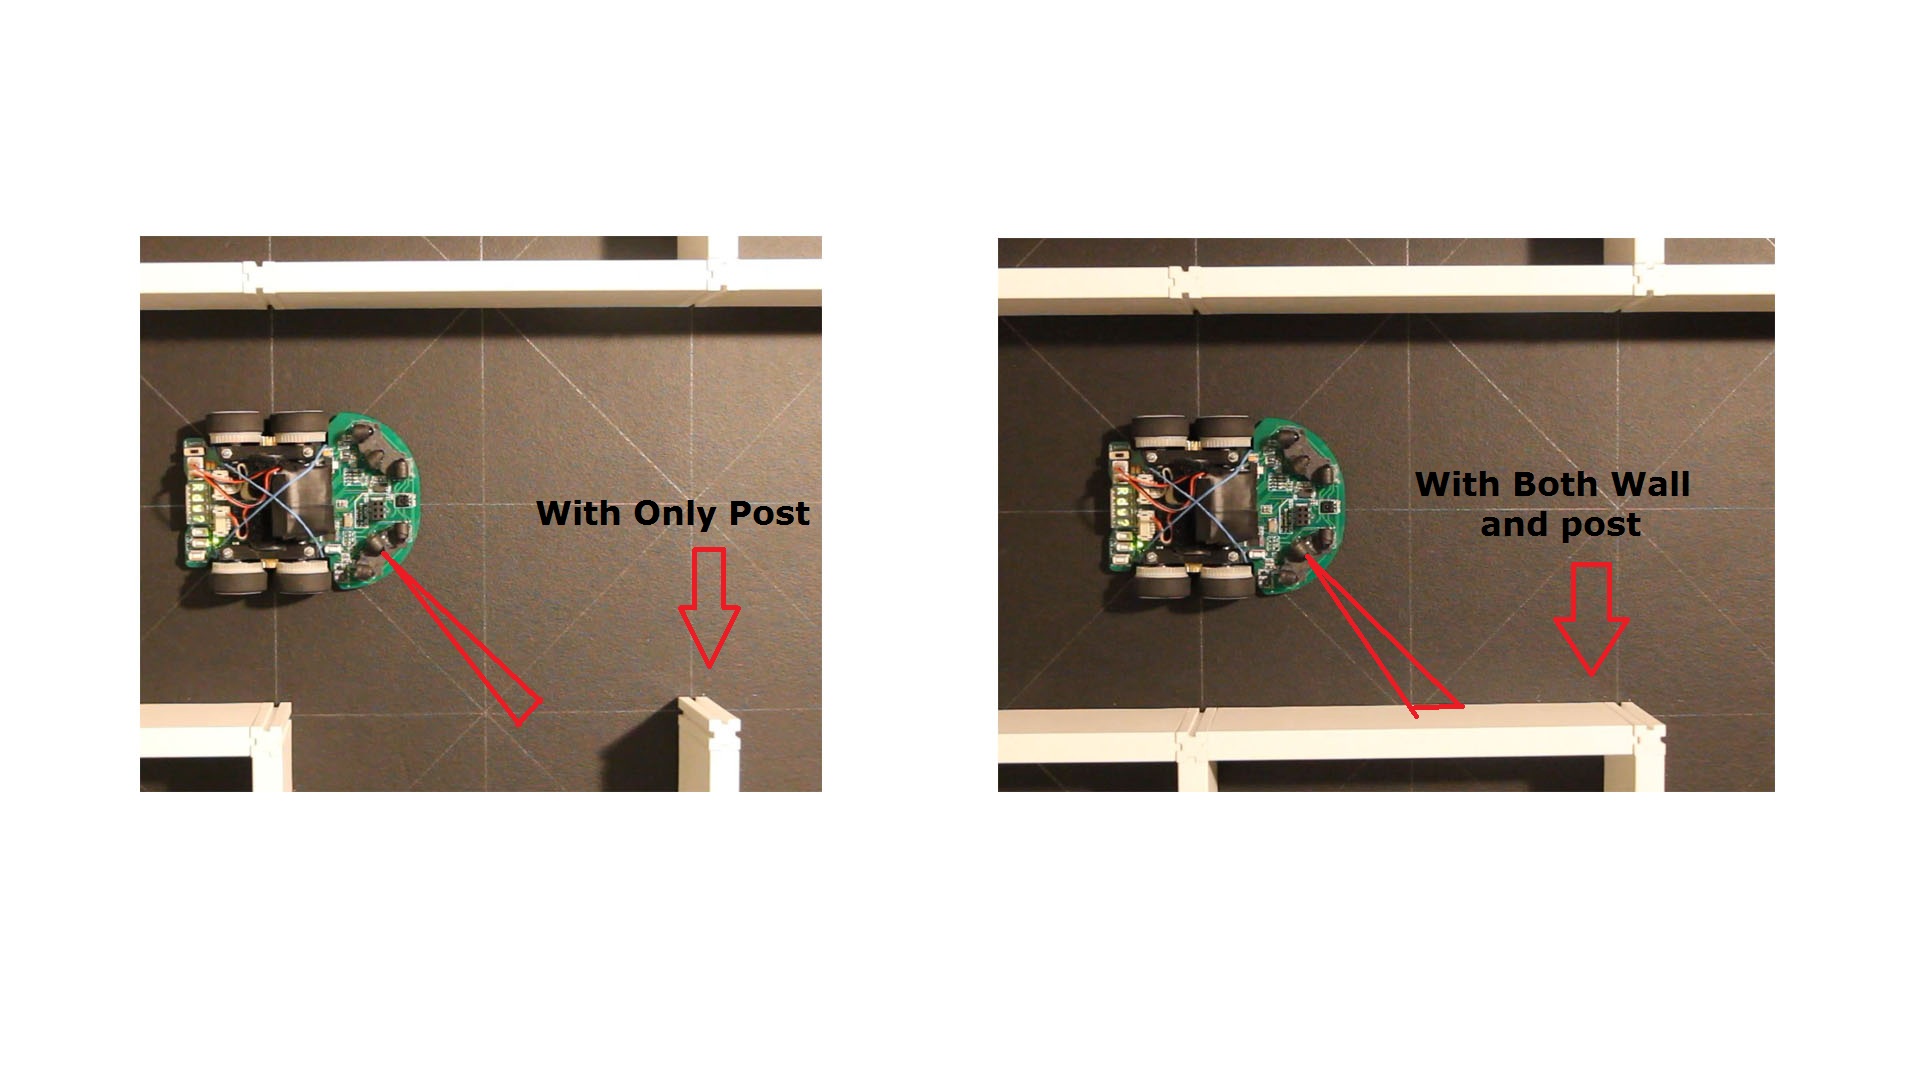
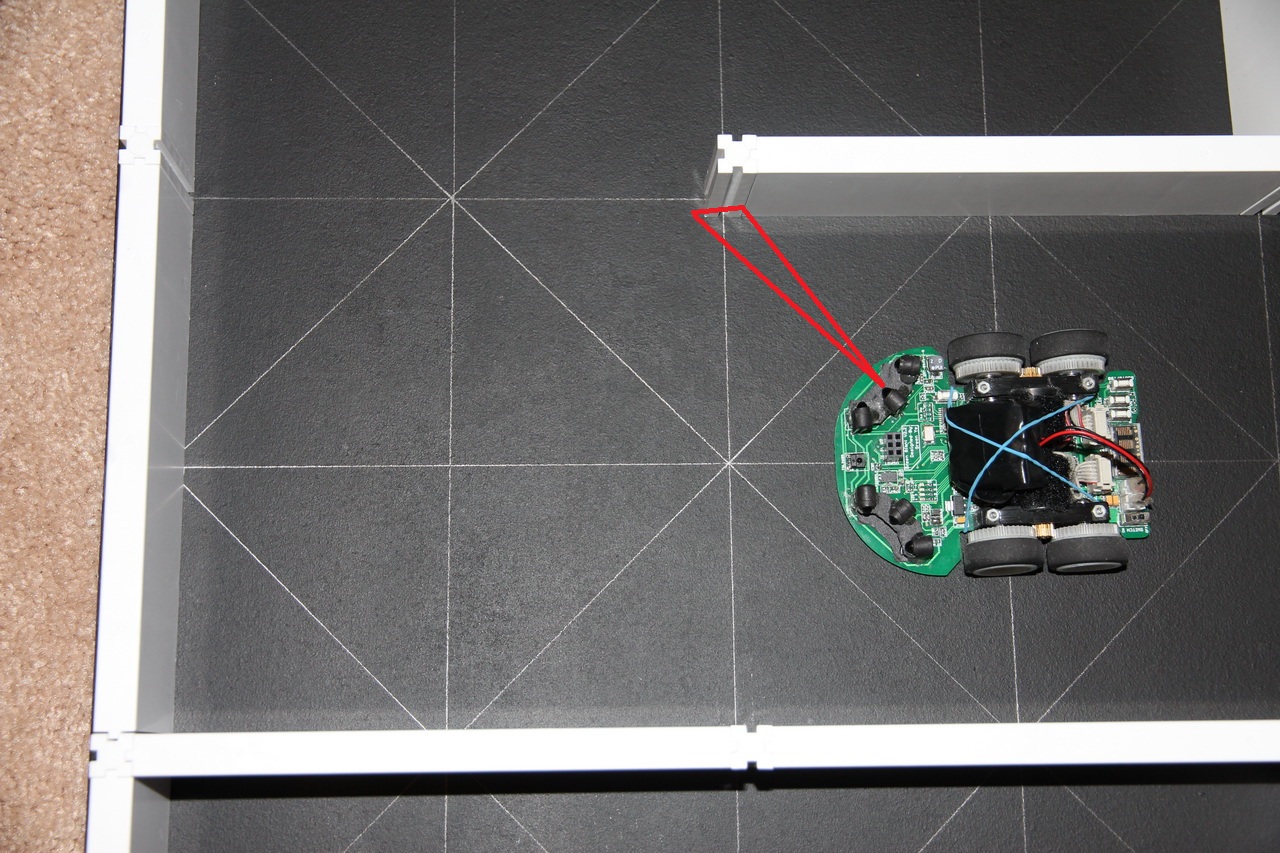
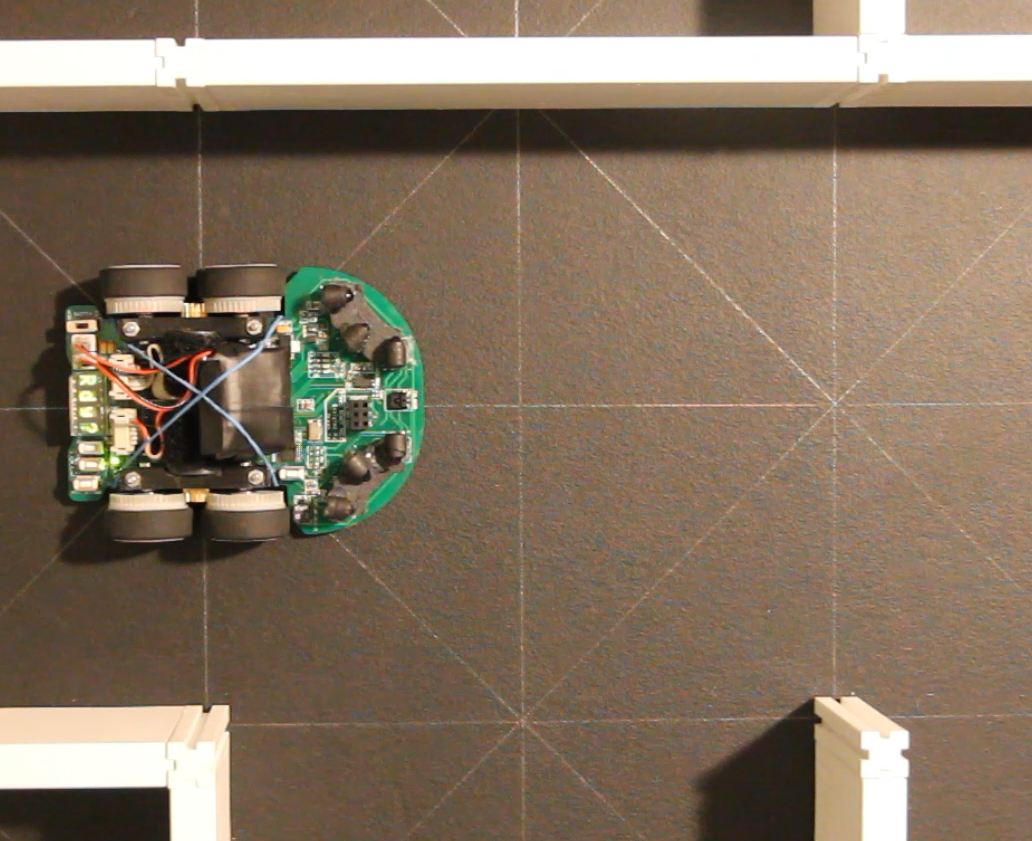
Thus, the expected max sensor reading reflected from a post should be smaller than reflecting from a wall. In order to prove this, I made my mouse record the right diagonal sensor value every one millisecond when the mouse was moving forward for one cell by starting and ending at the spot mentioned in the picture as follow:
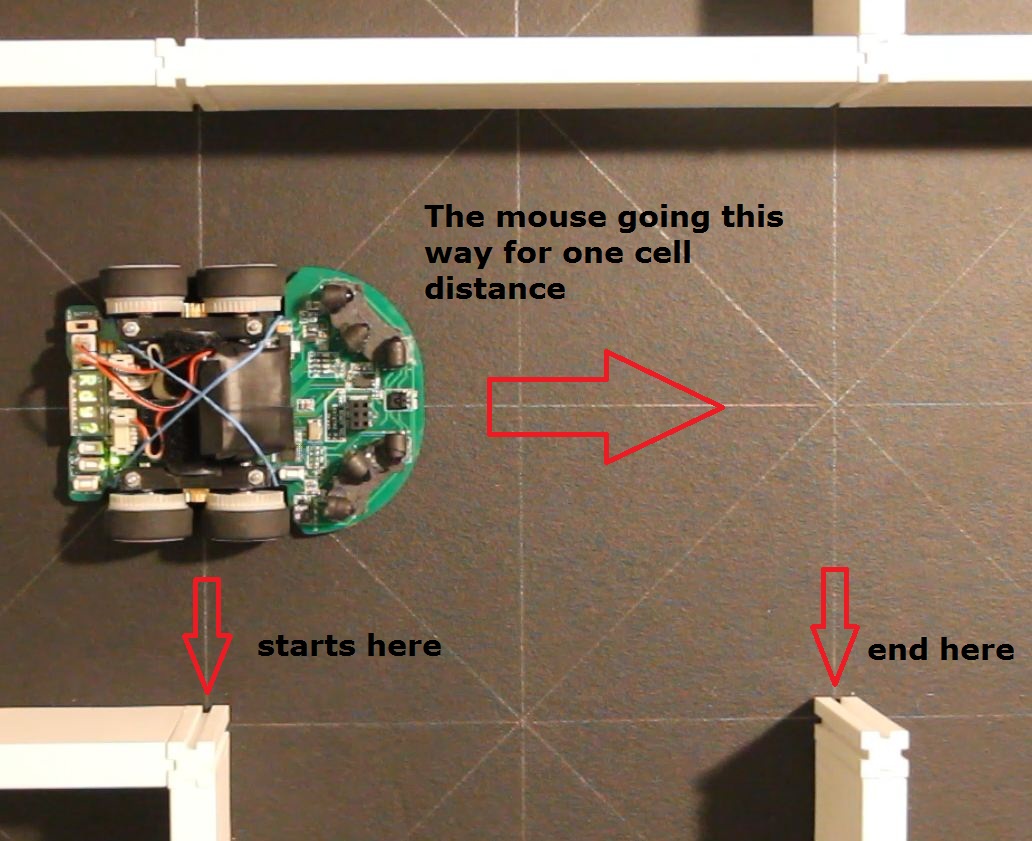
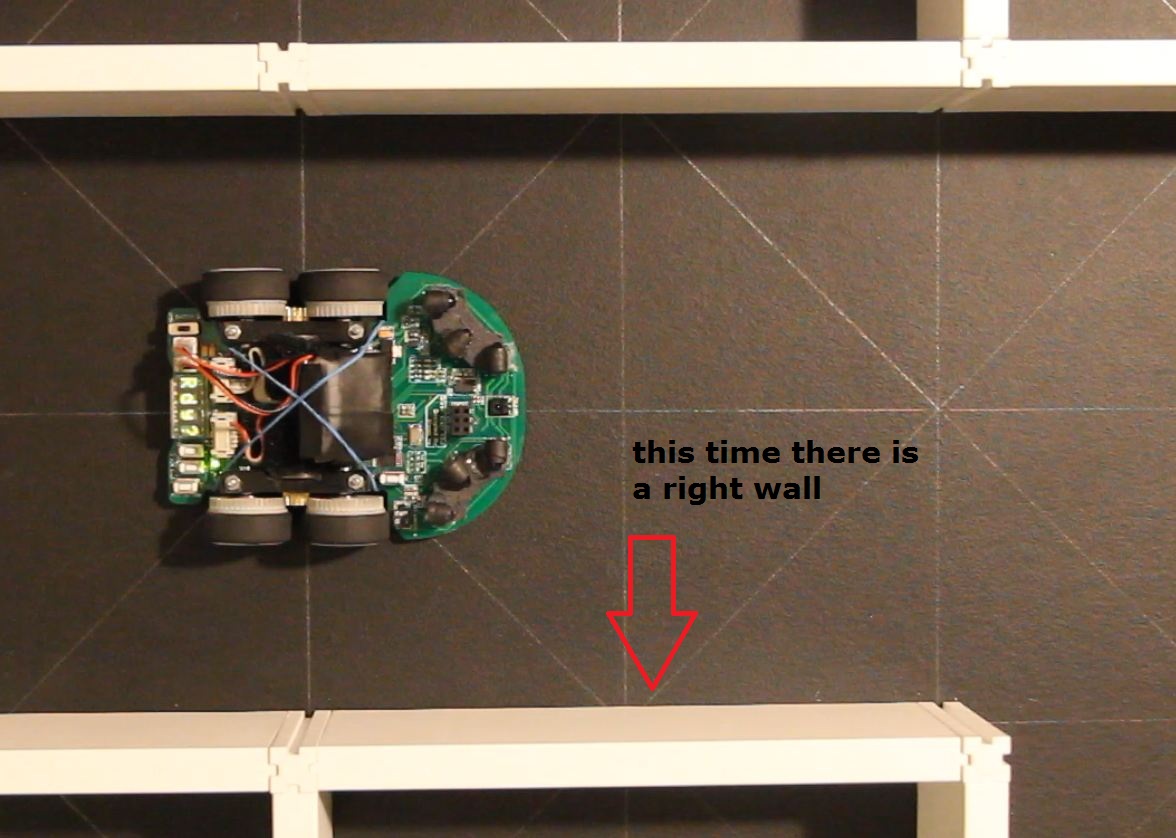
I did this twice, first time was to gather the data when there was no right wall, and one post can be detected during the process. The second time I pretty much repeat the same procedure except a wall was added to right side for mouse in order to compare the difference between two cases.
The mouse was running at exactly same speed and start at same place, running for exactly same distance. After I did these 2 trials above, a sketch had been formed based on the data logged out from my mouse through the Bluetooth adapter add-on. 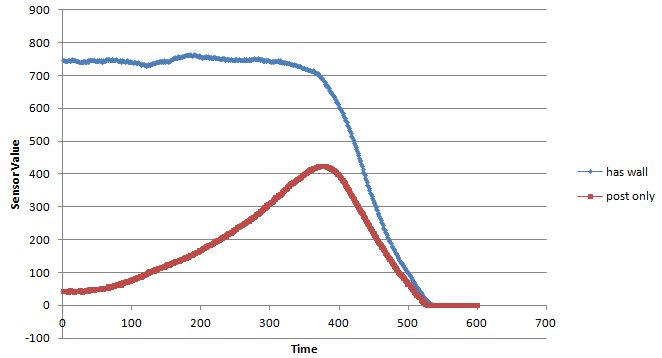
As you can see above, there are 2 curves when different colors represent the sensor readings through the process when the mouse was moving forward for one cell. The red one is the reading for my first trial, which was the case there was only post exist, and the blue curve is the case with wall to the right side. Same as what I expected, the maximum reading for the case with wall is much higher than the case without wall(with only post). 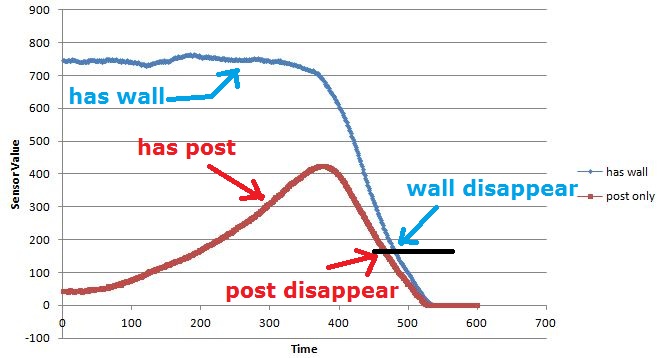
The similarity we can spot on the diagram above is the sensor readings were remaining at high values for some certain amount of time before gradually fading off. The area where the sensor readings were fading off is where the mouse detect the exiting edge of a wall or a post. This is what I called wall-to-no-wall or post-to-no-post transition at the beginning of this post.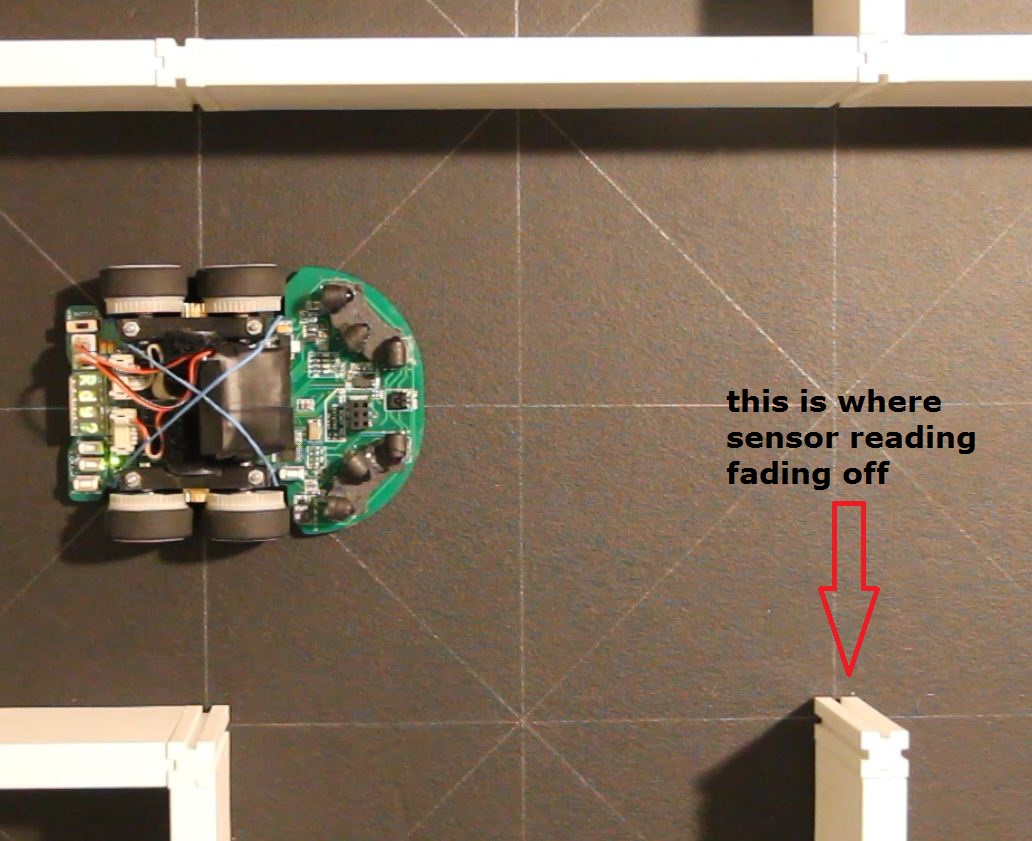
As long as what the sensor will behave, the logic becomes very simple to allocate when this transitioning process is going to happen. Here is some sample code for detect this process for right wall only(1ms interrupt is not used in this case, it will be same process for left wall detection):
void moveForwardOneCell(void)
{
hasRightWall = false;
do
{
int curt = micros();
readSensor();
if(rightDiagonalSensor > hasWallSensorValue)
hasRightWall = true;
if(rightDiagonalSensor < rightSideFadingOffValue && hasRightWall = true)
{
hasRightWall = false;
distance = someNewValue;
}
speedProfile();
mouseMoveforward();
while((micros()-curt)<1000);//keep 1ms sample time
}
while(distance<oneCellDistance);
}
just notice hasWallSensorValue and rightSideFadingOffValue can either be same value or the “rightSideFadingOffValue” be smaller than “hasWallSensorValue”. The reason I made one smaller to another is to prevent the transition process being mistaken detected multiply times when the mouse only passed by a single post or wall. 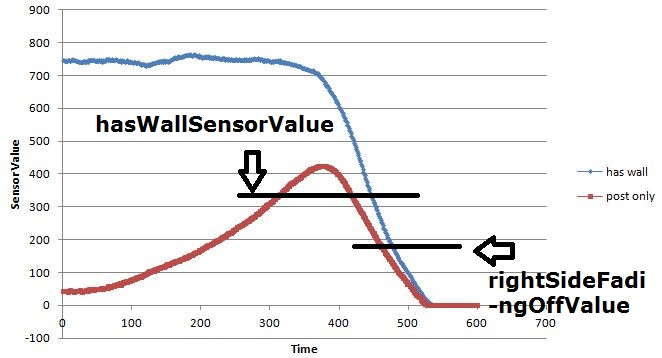
After all the explanations I made above, you will be able to understand how it works in the video demo I show below:
Because of “rightSideFadingOffValue” is detected at different place for wall-to-no-wall and post-to-no-past cases, the ending longitudinal position for mouse will be slightly different.

For my case, the different is only 4mm, it might be good enough if your mouse is running stable enough, however this quite critical for diagonal run since lots of times mouse are running “blindly” with less chance to do calibration compare to search run. Therefore, the 4mm different here is not tolerable. The way I dealt with it was just made 2 different cases when side wall is there or not. This is just a easy fix for me since the side wall information is usually known already before my mouse made decision for next movement action.
Other than the case above, This strategy can also be used at some other place for longitudinal calibration purpose.
One usage is for longitudinal correction in the diagonal straight away. Please see the picture as follow:
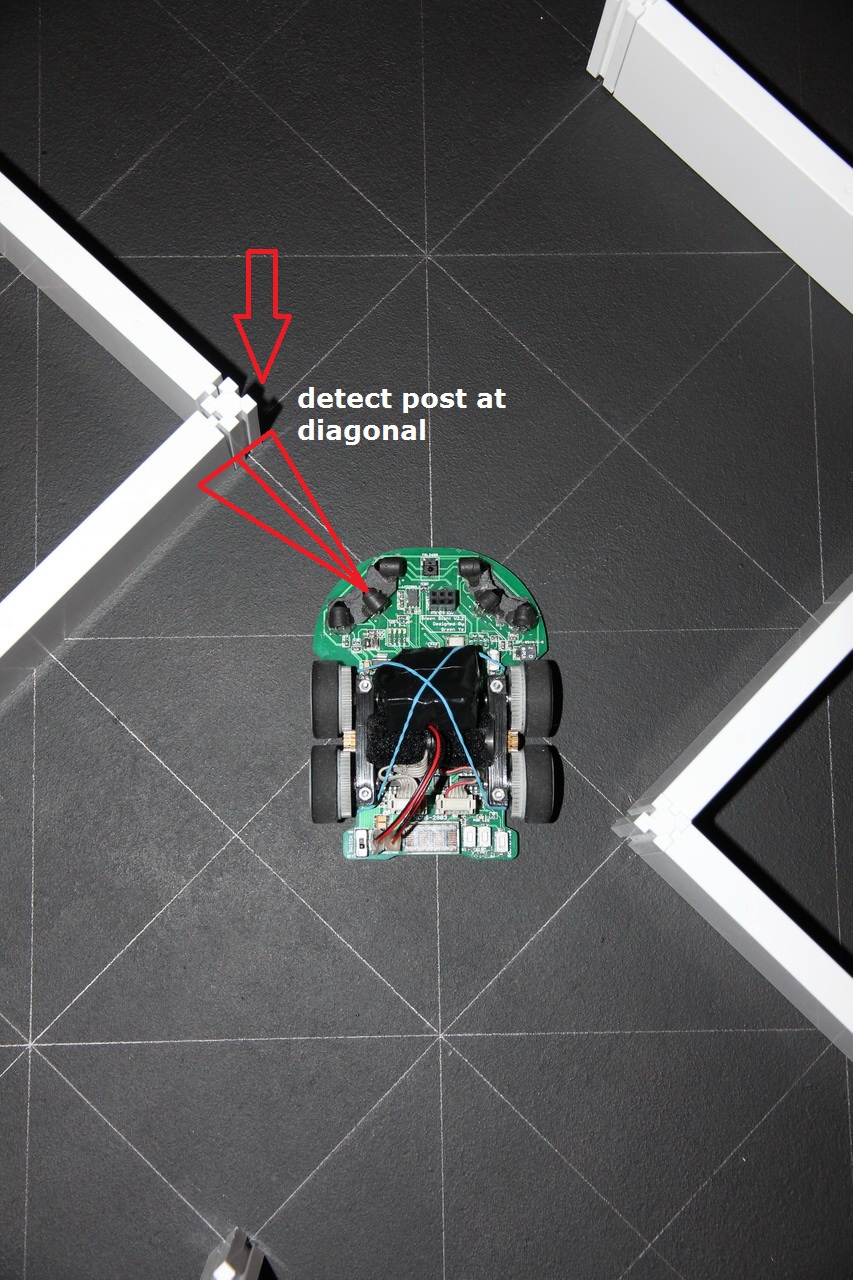
the other usage is to make a detection as the last chance for the mouse to correct longitudinal position before a turn in the diagonal run since all turns start earlier than the turns in search run. Therefore, front sensor values are too weak to help the mouse to correct its position before turn since front wall is way farther than the front wall in search run. 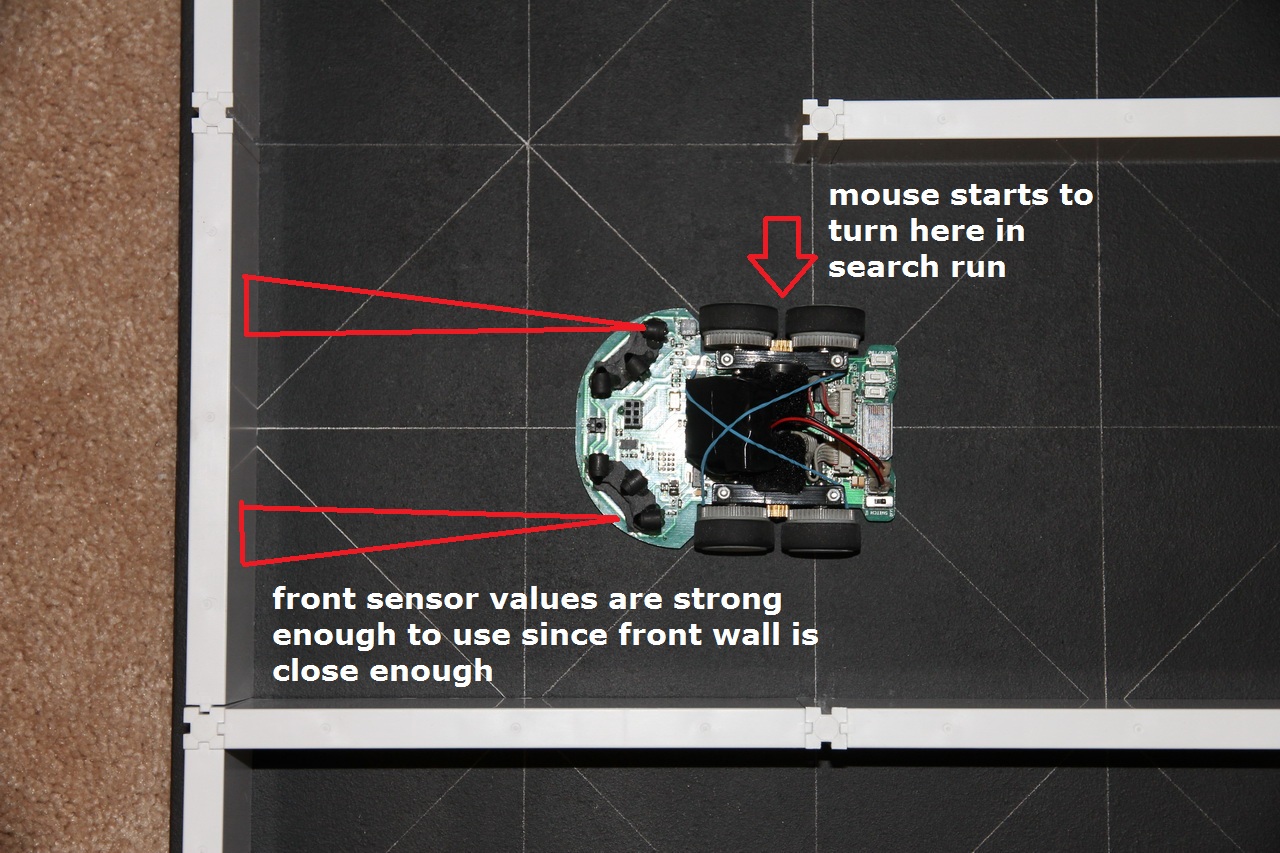
Please be aware that this strategy will only be accurate if and only if the mouse remains in the middle of the cell, otherwise, more special tectonics are needed. I might talk about this in the future.
The content preparation took me longer than I expected since I was trying to make everything being explained super clear(however I don’t think I make it here 🙁 ) I hope you will be able to utilized this helpful strategy to make your mouse run smoothly and stably in the maze after you read this!

Wow, thank you for this. It was very informative. I noticed the sample code would not account for the difference between post and walls falling edge. I have adapted the code and come up with the following:
void moveForwardOneCell(void)
{
hasRightWall = false;
do
{
int curt = micros();
readSensor();
if(rightDiagonalSensor > hasWallSensorValue)
hasRightWall = true;
else if(rightDiagonalSensor > hasPostSensorValue)
hasRightPost = true;
if(rightDiagonalSensor < rightSideFadingOffValue && hasRightWall = true)
{
hasRightWall = false;
distance = someNewValue;
}
else if(rightDiagonalSensor < rightSideFadingOffValue && hasRightPost = true)
{
hasRightPost = false;
distance = otherSomeNewValue;
}
speedProfile();
mouseMoveforward();
while((micros()-curt)<1000);//keep 1ms sample time
}
while(distance<oneCellDistance);
}
Do you think that will work properly? otherSomeNewValue would be the value to make the mouse stop at the right distance for post detection.
actually, I just realized that “hasRightPost = false;” should also be put after the hasRightWall is reset in order to make sure that both cases dont execute.
I did this on purpose to make every look simple otherwise it will kill the interest for people to keep reading on this article 🙂
I think yours will work.
You made 2 different triggering condition and 2 different ending conditions for determine post and wall.
I only use one triggering condition and 2 ending conditions to distinguish wall and post difference since I don’t care when the condition being trigger as long as the sensor reading for both wall and post are higher than some certain value.
I record the existence of left and right wall at the very beginning of the function void moveForwardOneCell(void)
In this case, sample code might like this:
bool weHaveARightWall;
void moveForwardOneCell(void)
{
hasRightWall = false;
if(rightDiagonalSensor > hasWallSensorValue)
weHaveARightWall = true;
else
weHaveARightWall = false
do
{
int curt = micros();
readSensor();
if(rightDiagonalSensor > hasWallSensorValue)
hasRightWall = true;
if(weHaveARightWall)
{
if(rightDiagonalSensor < rightSideFadingOffValue && hasRightWall = true) { hasRightWall = false; distance = someNewDistValueForWall; } } else { hasRightWall = false; distance = someNewDistValueForPost; } speedProfile(); mouseMoveforward(); while((micros()-curt)<1000);//keep 1ms sample time } while(distance
Hello again,
Your way definitely looks simpler. I will try to take that into account. I have one more question that comes to mind: How would you adapt this to work with a long straight? The calibration would have to know which cell it is in to know what distane to set it to.
An idea I’m thinking of now would be to have a relative distance, say the amount into a cell I am, starting with 0 at the cell boundary. this relative distance would reset at every 180mm.
Then, let’s assume the post can be detected at 160mm. Instead of the following code:
distance = someNewDistValueForWall;
we could use
distance += relativeDistance-160;
Is that how you do it? Thank you for your advice.
I must say,I have been watching videos of your mouse in action, and the stability is amazing.
I am actually working on a micromouse on my own on the island of maui. I have head that the university of hawaii has a large micromouse project.
yeah, University of Hawaii did well every year and took 1st and 2nd places at this year IEEE region 6 central area regional micromouse competition. I know some of their students since they participated CAMM last year. I also know there is an instructor also name Galen working in EE department at University of Hawaii has something to do with Micromouse.
For my mouse, based on where the diagonal sensor points to, the mouse will detect the opening after it runs for 100mm, in this case the tolerance for one cell is almost plus minus half cell.
Yes, you are right, if the there are openings on every cell such as fish bone, the mouse will recalibrate its longitudinal position one every cell. The worst case is on a long straight path with no openings during the process until the last cell.
by the way, what does relativedistance do?
I have the function speedProfile called every millisecond to increase the variable “distance”
whenever the ending condition being detected, the distance has been passed and distance left for one cell should be a constant value, so I choose to overwrite it with a pre-tested constant value.
This is only true for search run.
On diagonal speed run, since the mouse update the cell position at the center of cell instead on the boundary, it might be awkward for diagonal sensor to detect opening on every cell. I use side sensor to do this during diagonal run and only use diagonal sensor the detect opening of the last cell before turn. For those only have 4 sensors, probably they only do the detection of the last cell during diagonal speed run. This is what I am planning on my next mouse since I will turn back to 4 sensors in order to save time from sensor pulsing.(4 sensors take less time to switch on and off than 6 sensors.)
Pingback: Kalibracja czujnika ściany - ucgosu.pl
Pingback: Wykorzystanie SLAM do Micromouse - ucgosu.pl
Hello, first thanks for the information. I’m a beginner of Micro Mouse, and by calibration I have met a problem: the signal of my IR sensor is so weak that I can’t tell there is a wall nearby or not(I made the IR sensor myself). Can you offer me a solution of IR sensoren? Either the develop methode or the way to buy the useful sensors is appreciated. Thanks for your help.
with regards
Zhe Liu
I don’t have any solution to sell.
However, my following the circuit I had on my mouse, either Futura or my GreenGiant Series, you will find I pulse high current to the IR LED to achieve a high power signal in a very short moment in order to have enough reading from the IR receiver.
All details can be found at my project futura tab on micromouseusa.com
If you are not pulsing IR LED at high current, at least you can change the IR receiver voltage divider value to achieve a higher reading.
Hello, thanks for the reply. The current for each of my IR LEDs is 100mA and I use also the pulse to supply the power. But the signal I got was about 5~60 while the ADC full range is 0~4096(12 Bit), maybe I need a voltage divider to improve the reading.
That is very low. If the regulator can supply that much current to emitter, the receiver value shouldn’t be that low as long as the divider resistor is at a reasonable range. U also need to make the emitter turn on for enough time until the reciever is fully charged.
Maybe it’s the problem with divider resistor, I will change it in my next mouse. Thanks for help!:)